UPDF for Windows
 UPDF for Mac
 UPDF for iPhone/iPad
 UPDF for Android
 UPDF AI Online
 UPDF Sign
 Read PDF
 Annotate PDF
 Edit PDF
 Convert PDF
 Create PDF
 Compress PDF
 Organize PDF
 Merge PDF
 Split PDF
 Crop PDF
 Delete PDF pages
 Rotate PDF
 Sign PDF
 PDF Form
 Compare PDFs
 Protect PDF
 Print PDF
 Batch Process
 OCR
OCR UPDF Cloud
 About UPDF AI
 UPDF AI Solutions
 AI User Guide
 FAQ about UPDF AI
 Summarize PDF
 Translate PDF
 Explain PDF
 Chat with PDF
 Chat with image
 PDF to Mind Map
 Chat with AI
 User Guide
 Tech Spec
 Updates
 FAQs
FAQs UPDF Tricks
 Blog
Blog Newsroom
 UPDF Reviews
 Download Center
 Contact Us
Before We Begin
Windows • macOS • iOS • Android 100% secure
Seeing the “macOS installation couldn't be completed” error on my screen was frustrating during the reinstalling and updating of my system. This issue initially confused me about how to resolve it and why I was seeing this warning, but after trying a few methods, I finally managed to fix it.
In this article, I’ll discuss why this error occurs and methods for fixing it step by step, from switching networks to correcting system time. I’ll also talk about an all-rounder UPDF Mac app, a top-notch PDF editor and viewer, to boost work performance after resolving this error.
Part 1. Why do I Get “macOS Installation Couldn't Be Completed” Error?
The error “macOS installation couldn’t be completed” occurs during the update or reinstallation of the system. Multiple reasons, including insufficient disk space and sudden power loss, cause interruptions in the update or installation. Let’s discuss all the underlying issues leading to this error.
1. Insufficient Disk/Storage Space
Mac requires enough space to reinstall or update its system, but if there is not enough disk storage on the system, it won’t download or unpack. This issue typically results in a failed or incomplete installation.
2. Corrupt MacOS Installer
Transferring or downloading macOS installer files can sometimes cause the files to become corrupt. If the file is corrupted, it won’t run and hinders the installation. The process may either not start or crash halfway.
3. Internet Connectivity Issues
If the update or reinstallation of the files got interrupted due to internet connectivity issues or a slow, unstable connection, it won’t install and may crash midway. Even a minor connectivity gap can lead to an incomplete installation.
4. Outdated or Incompatible Hardware
Old hardware versions may not always support the latest macOS updates. So, in case of outdated or unsupported hardware, the system might not update or reinstall.
5. Corrupt System Data or Disk Problems
Disk errors or disrupted system files do not allow the installer to write new data. This issue usually leads to failure in reinstallation or update.
6. Third Party Apps Login
The update or reinstallation failure is interrupted by the third-party apps that interfere with the system. This interference blocks the macOS setup, leading to an unexpected crash.
7. Incorrect Time and Date setting
Incorrect time and date setting of your system leads to a failure in the verification of the macOS installer. This mismatch prevents the installation from proceeding until it is corrected.
8. Forced Shutdown or Sudden Power Loss
If there is an unexpected shutdown or power loss during installation, the process will get interrupted, leading to a failure. The error will display on the screen upon restarting the device.
Also Read: How to Fix Finder Not Responding on Mac? (7 Ways)
Part 2. What to Do if the macOS Installation Couldn't Be Completed?
Now that we have discussed all the possible underlying reasons behind the “macOS installation couldn't be completed” error, it is time to talk about fixes. I’ve listed all the reliable methods below to fix this issue. Follow the instructions step-by-step to complete your macOS installation.
Fix 1. Switch to Another Network
If your internet connectivity is not stable or if your internet connection is lost, switch to a stronger and more reliable internet connection. After shifting, the macOS installer will verify and download all files seamlessly. Follow the steps mentioned below to switch to another network.
Step 1: On the home screen of Mac, click the wifi icon in the top right corner of the menu bar.
Step 2: From the dropdown menu, select a stronger, reliable, and stable internet connection.

Step 3: Once connected, you can start your download and installation.
Fix 2. Restart Mac and Try Again
If you face a problem fixing the “macOS installation couldn’t be completed” error repeatedly, restart your Mac. Restarting your Mac will clear all temporary glitches and give a clean start to your installation process. Follow the steps mentioned below to restart your Mac.
Step 1: On the Mac homescreen, click the Apple symbol in the top left corner of the menu bar.
Step 2: In the dropdown menu, select “Restart” to restart your system.
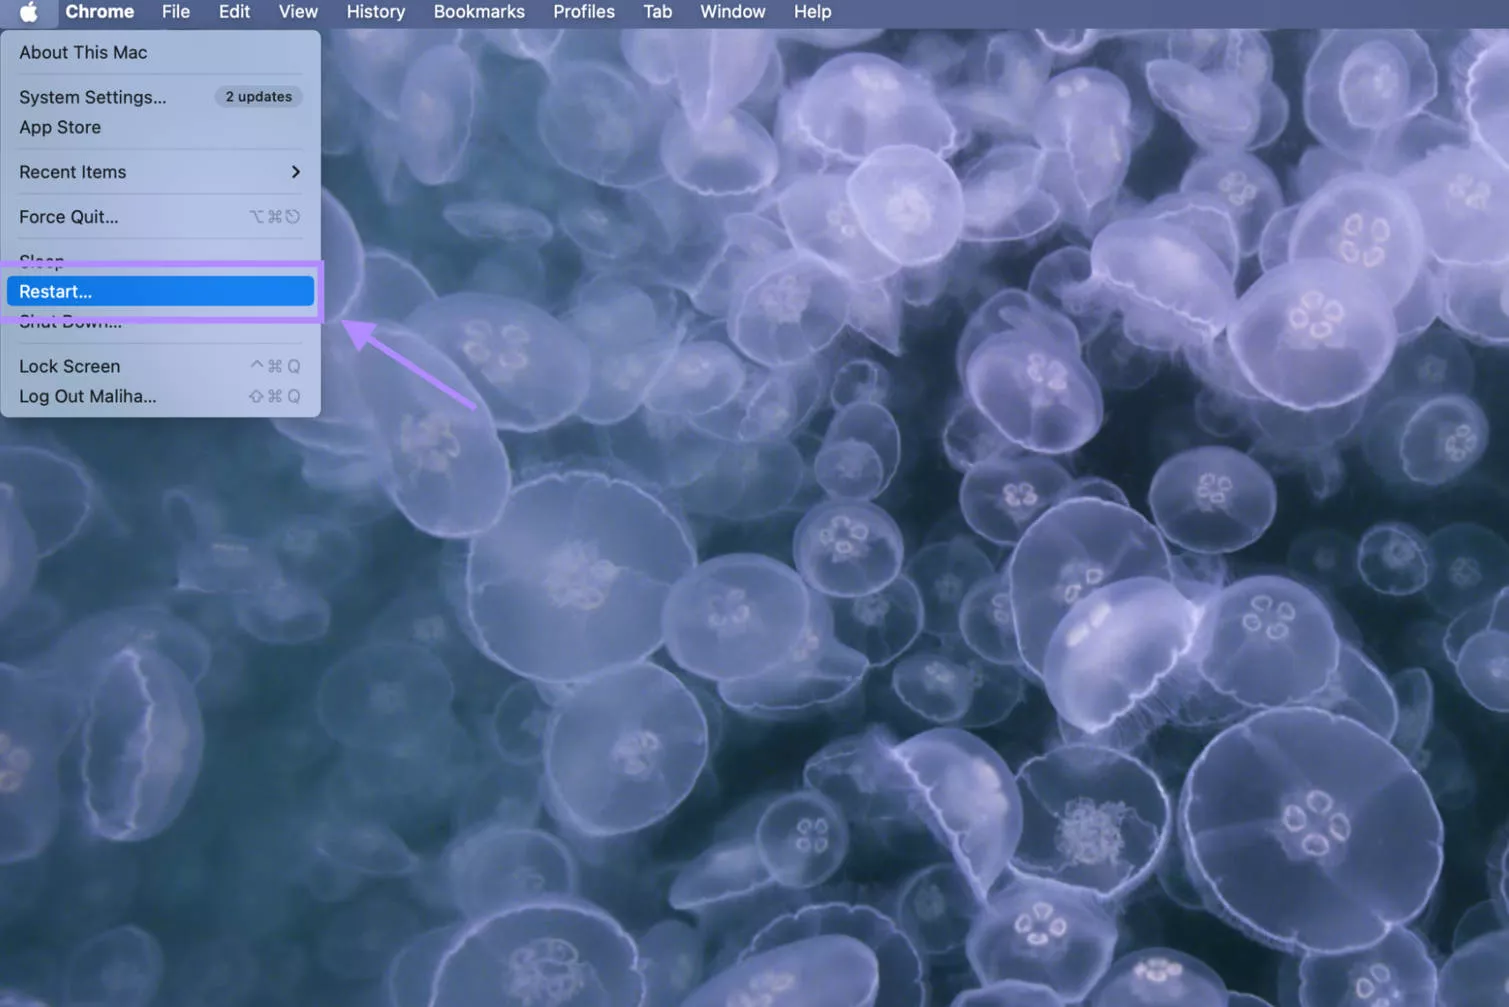
Step 3: Once the Mac restarts, run the macOS installer without interruption.
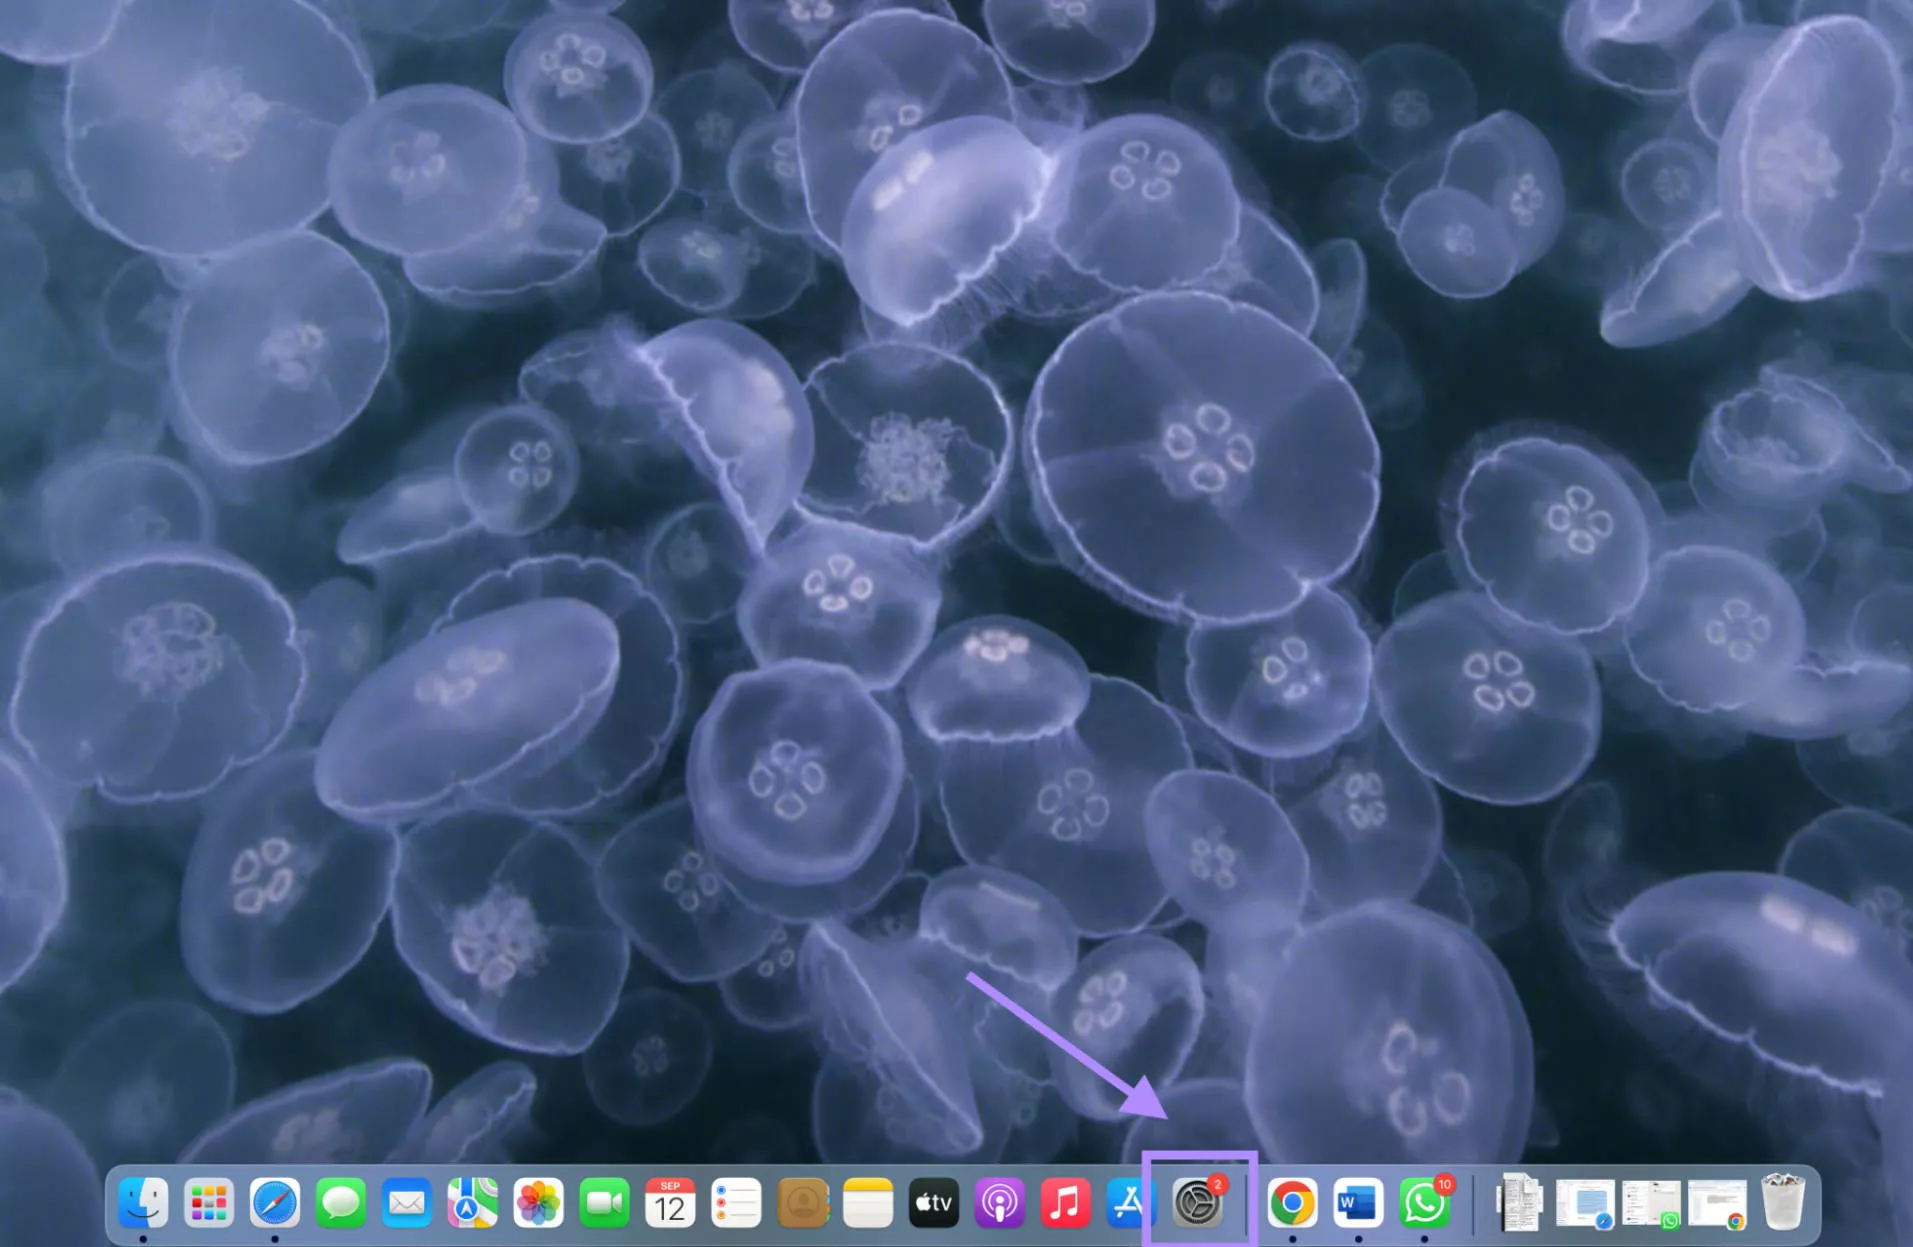
Fix 3. Get Enough Space
Insufficient storage space is one of the most common reasons behind incomplete or failed macOS installation. If you face the same issue, free up space on your Mac to continue with the installation. Follow the steps below to free up disc space.
Step 1: Click the Settings icon from the dock at the bottom of the homescreen.
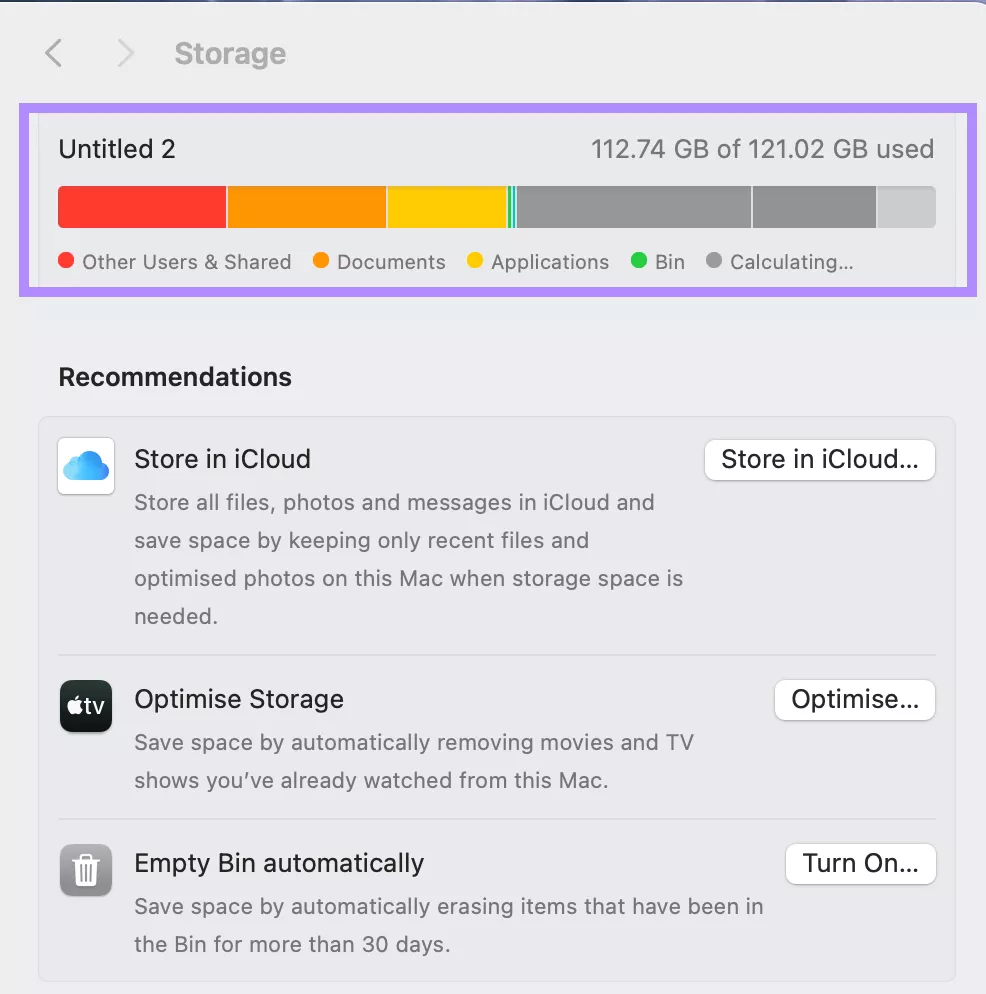
Step 2: Once the settings window opens, click “General” and then select “Storage” to check the available storage on your Mac
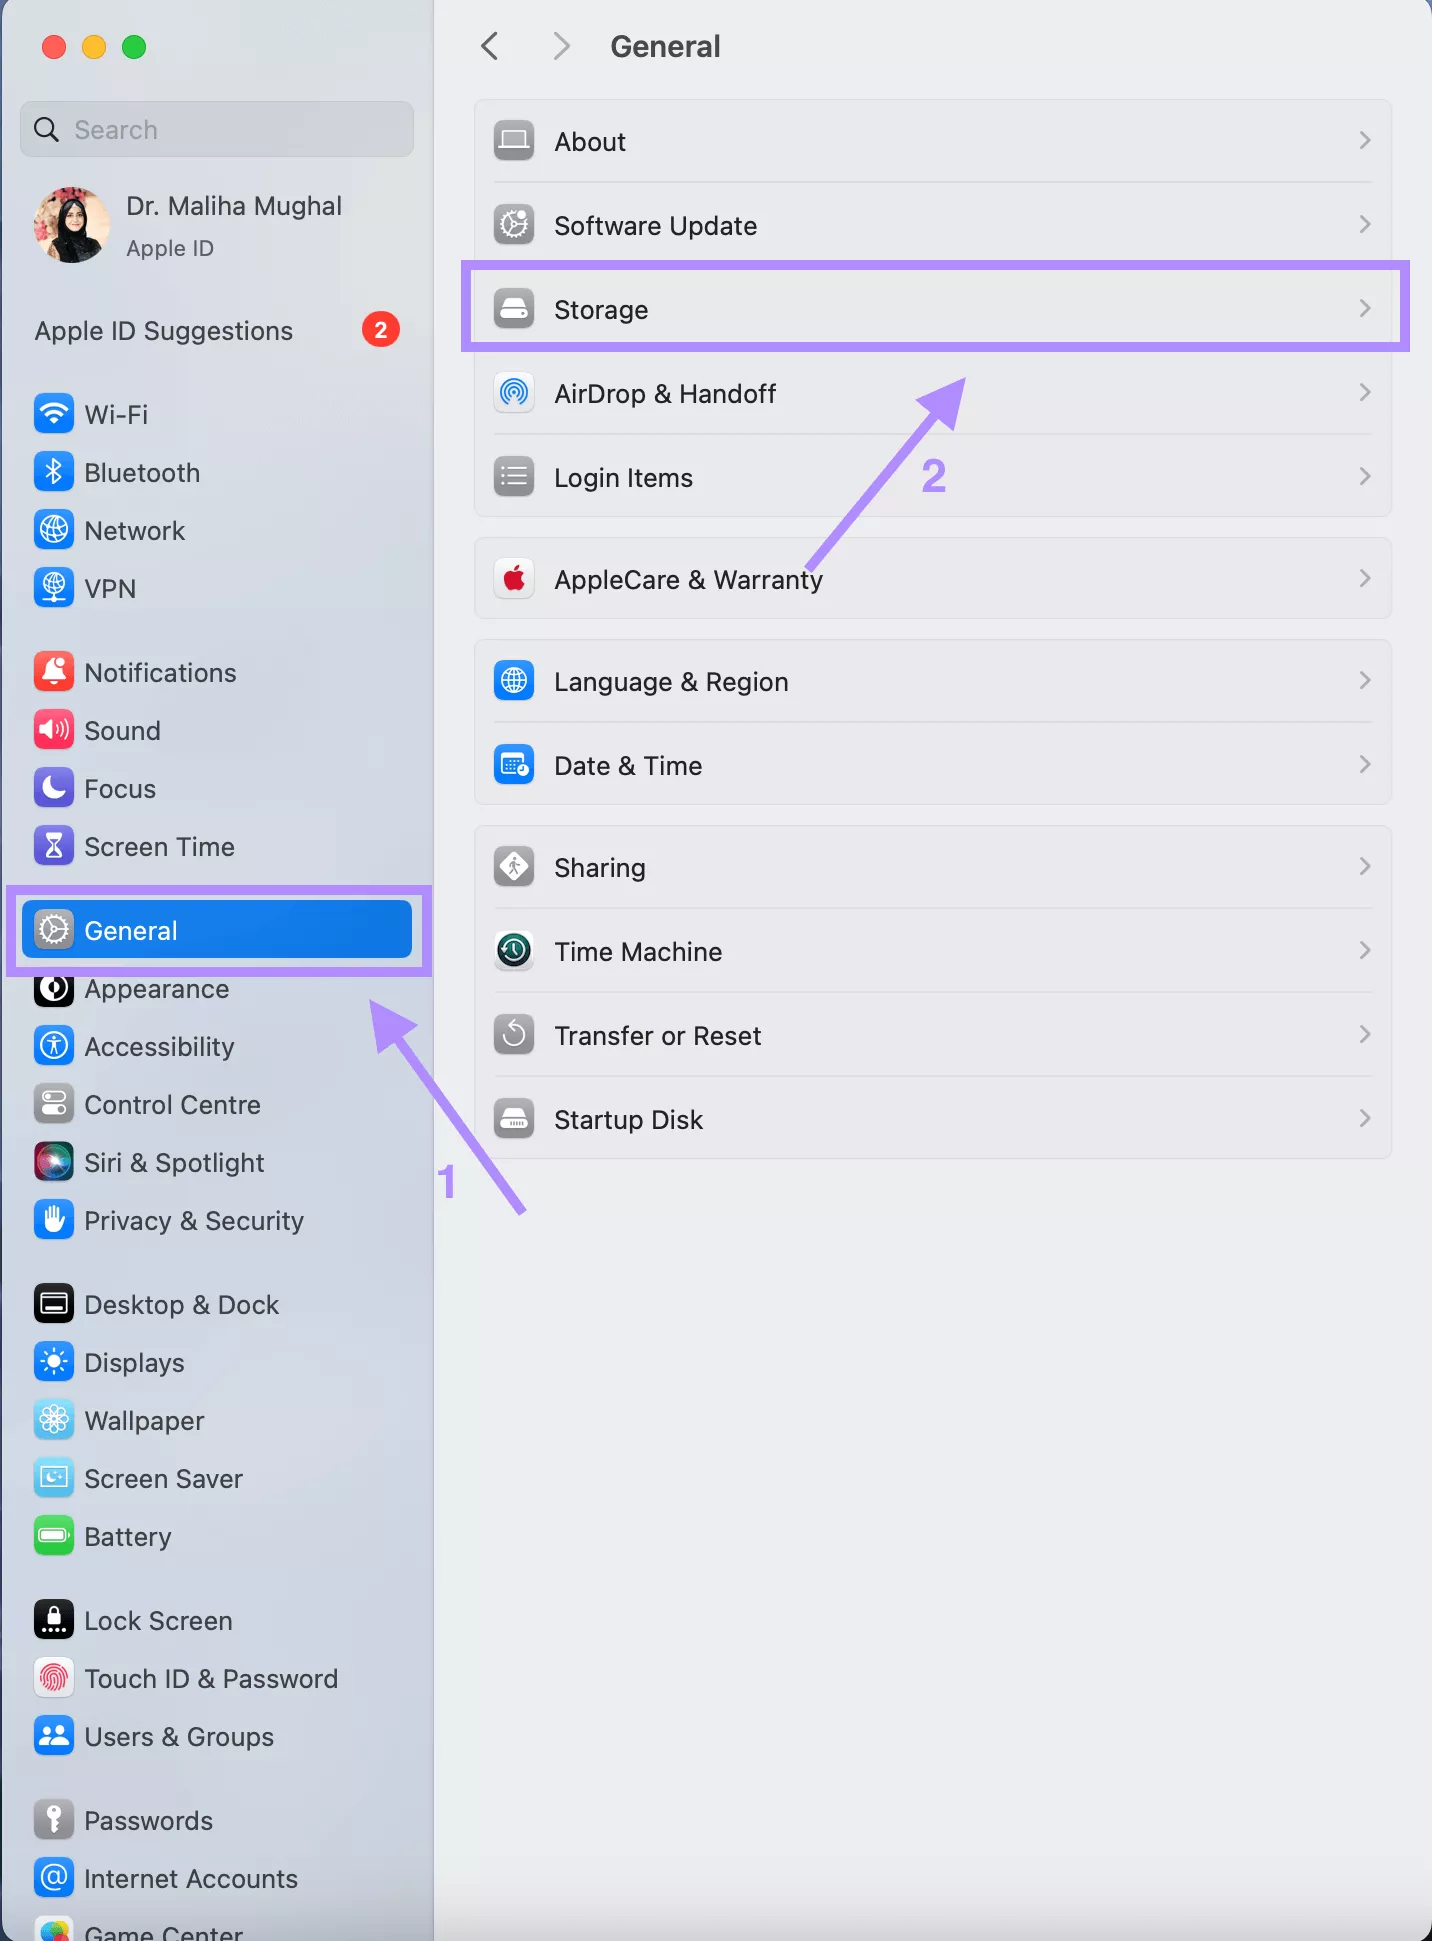
Step 3: Free up space by deleting unnecessary files or by emptying your bin. Make sure to free up to 25 MB for macOS installation.
Fix 4. Update Mac in Safe Mode
Only essential system processes are activated in safe mode. This feature enables bypassing the software conflicts, and your installation will be completed without crashes. The following steps will show you how to enter safe mode on your Mac.
Step 1: Long-press the power button of your keypad and turn off your Mac.
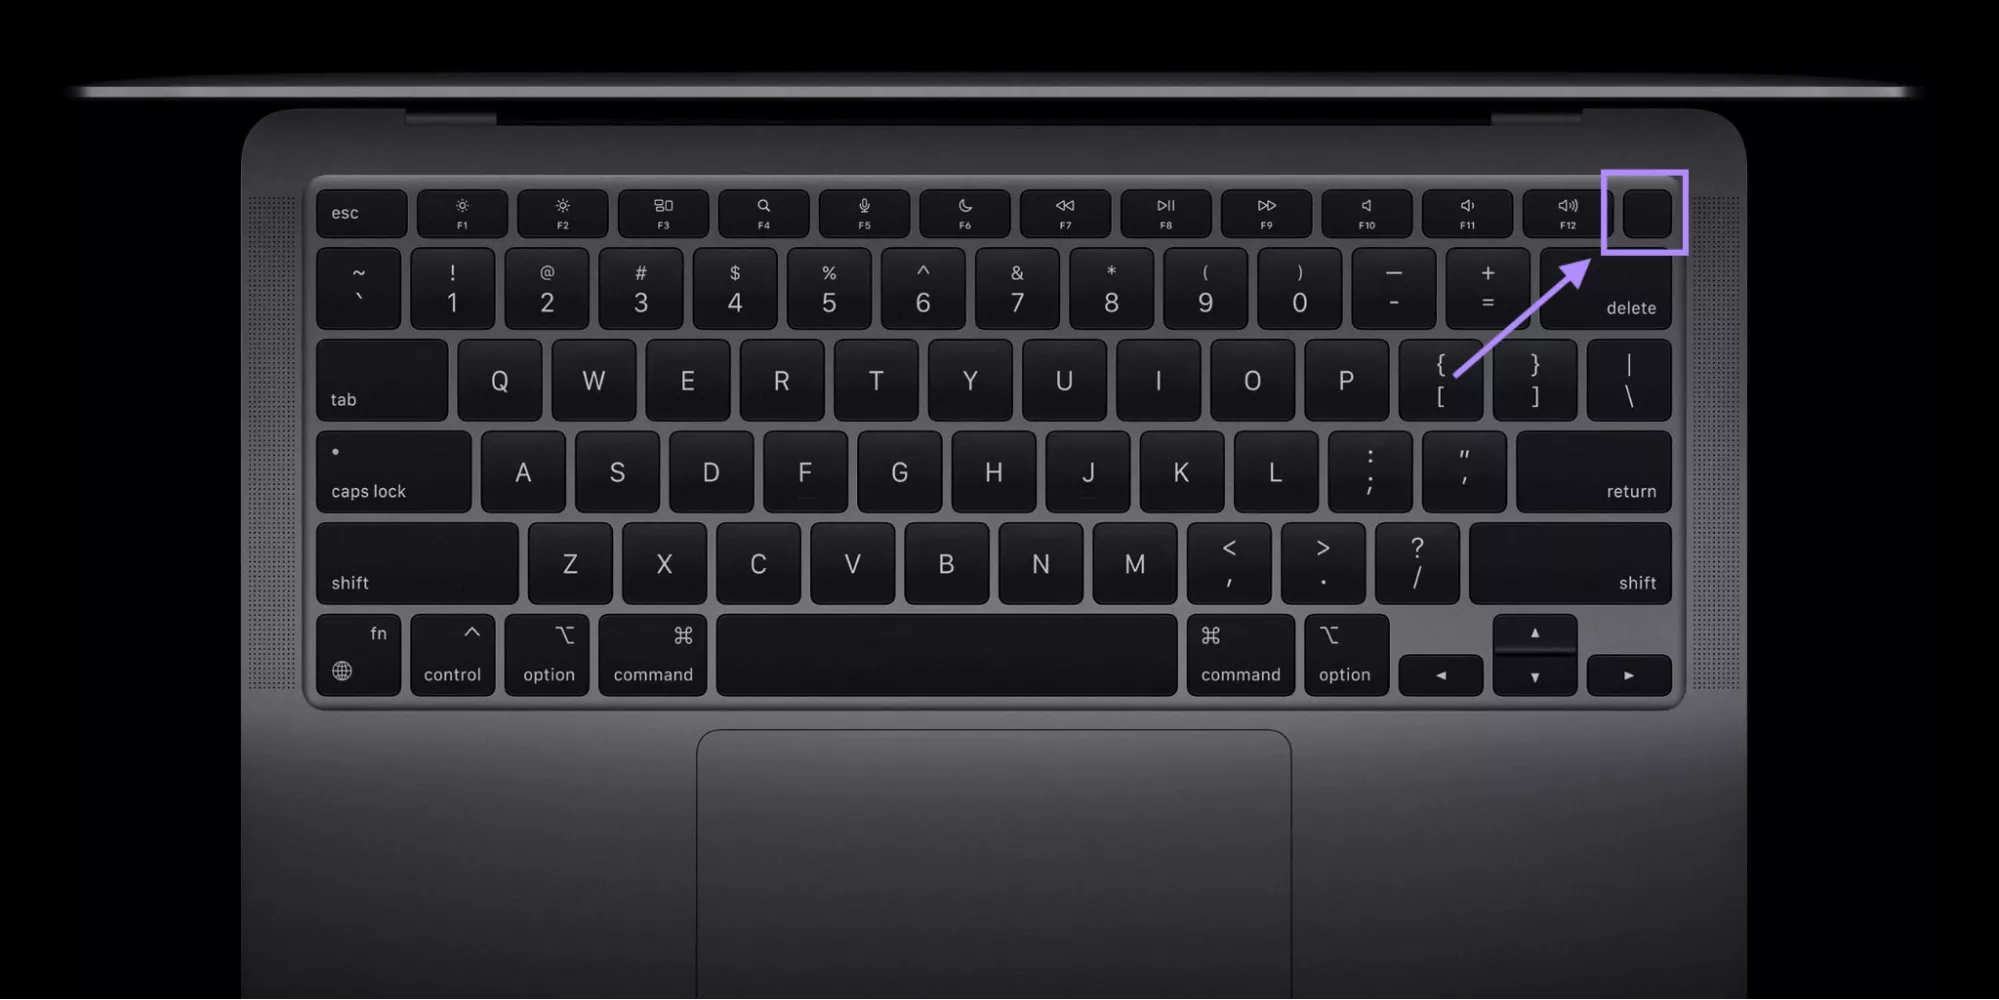
Step 2: Turn it back on, and press to hold the “shift key” before the login screen appears.
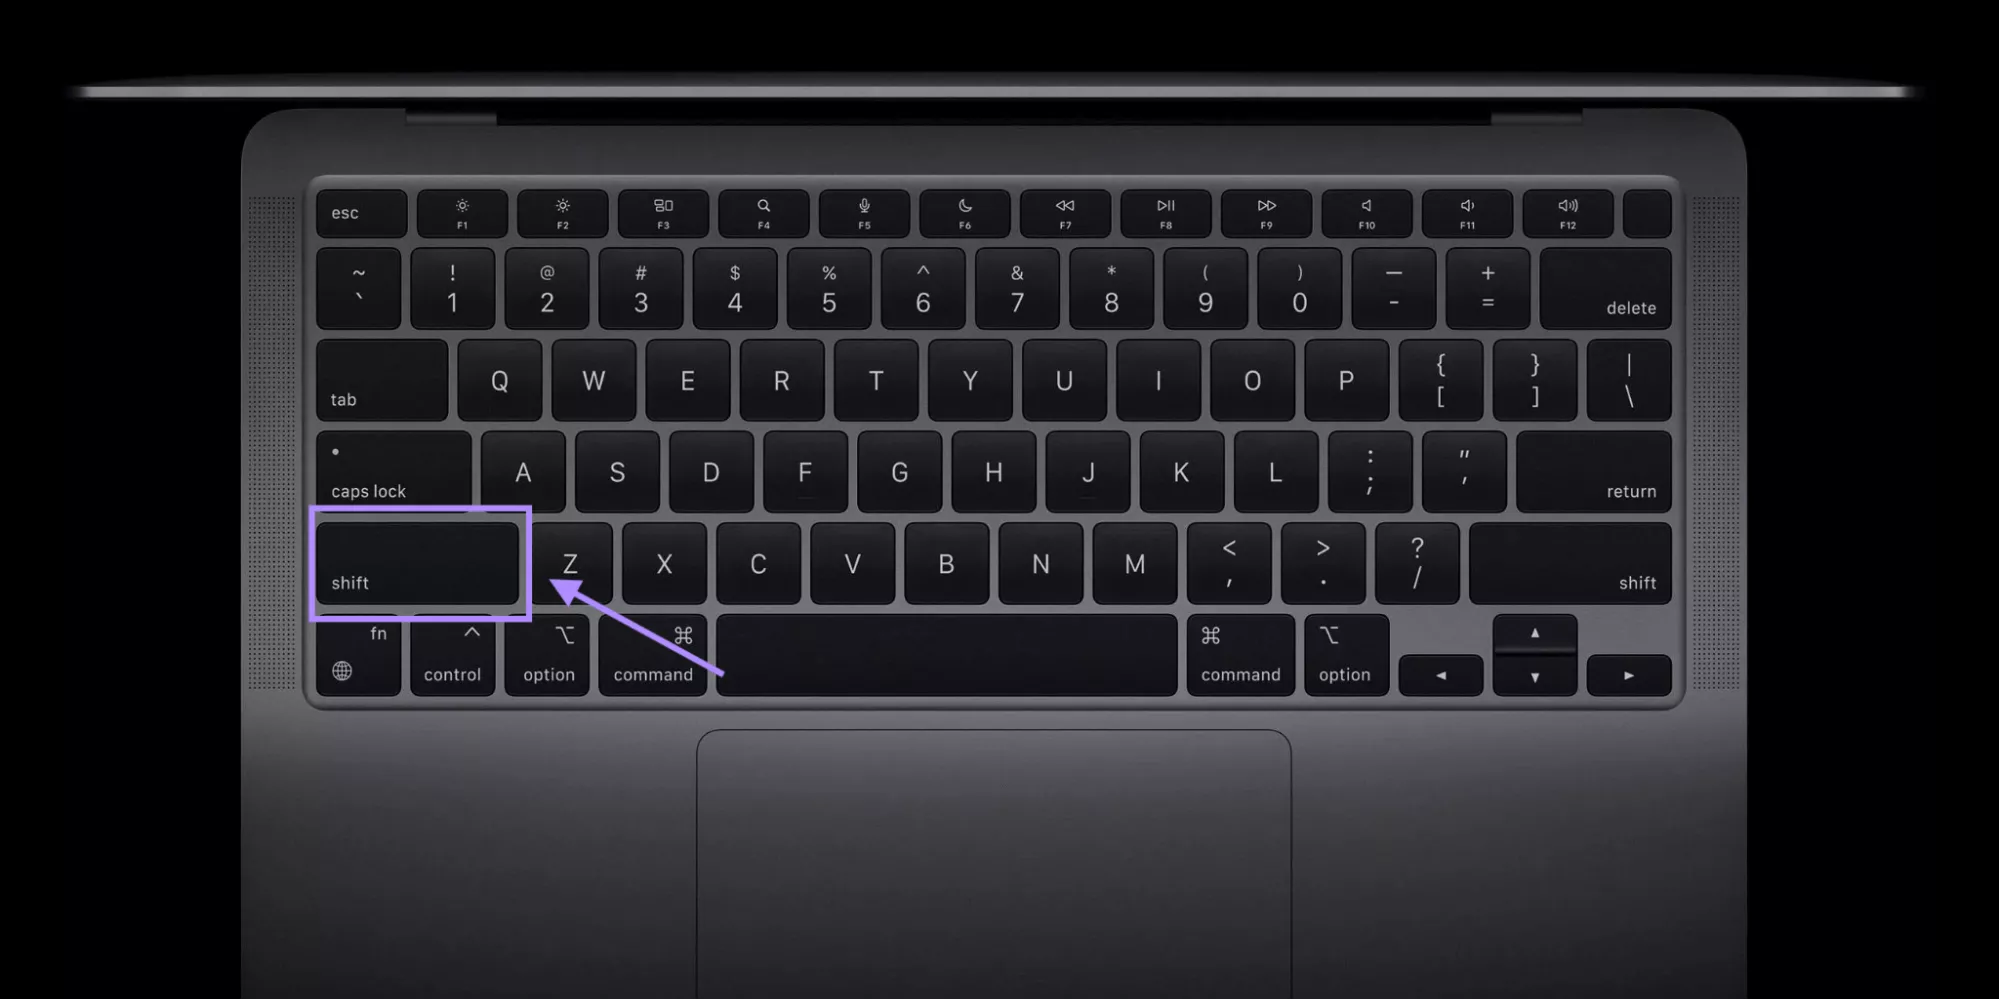
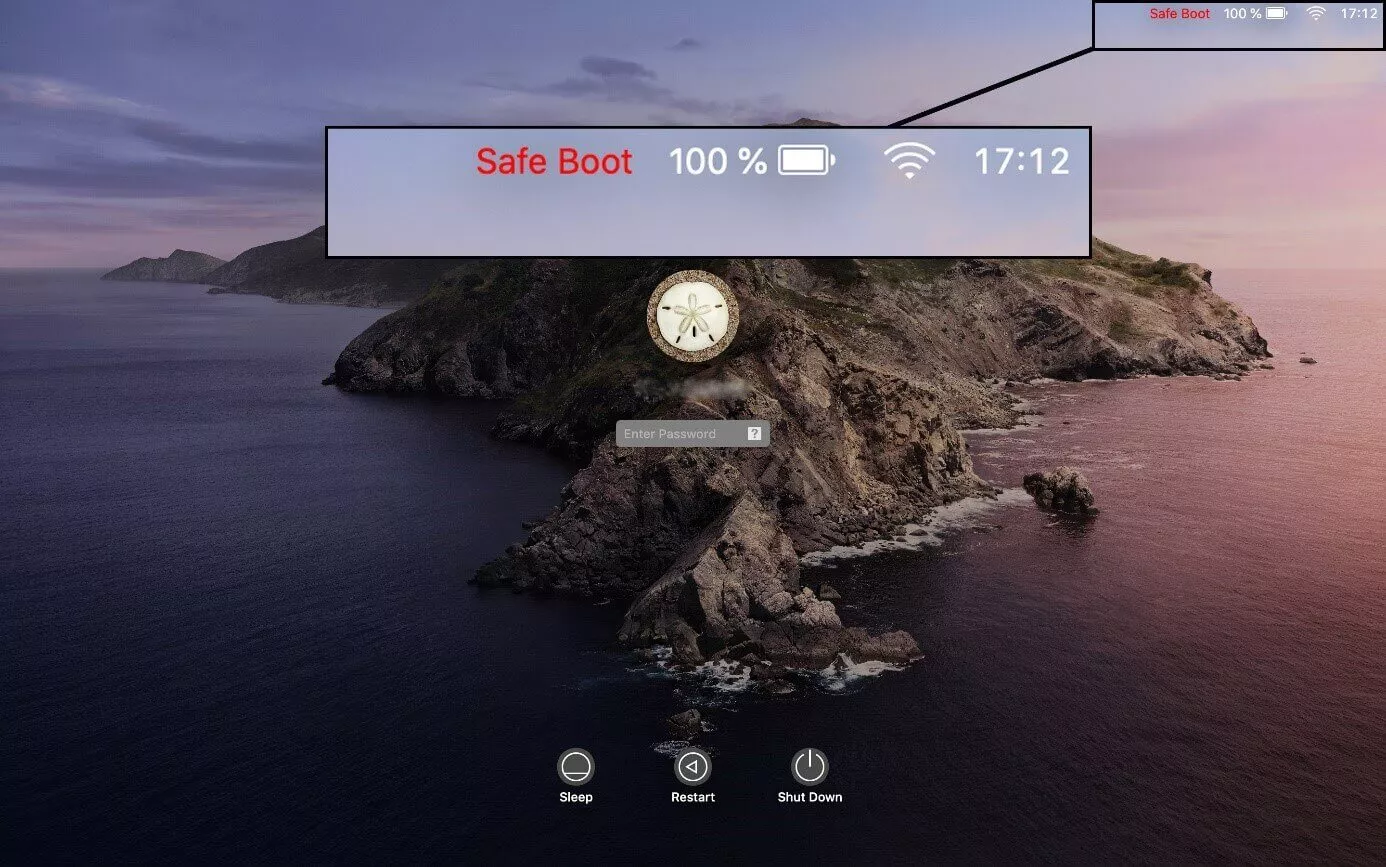
Step 3: On the login screen, you’ll see the “Safe Boot” in the upper right corner of the menu.
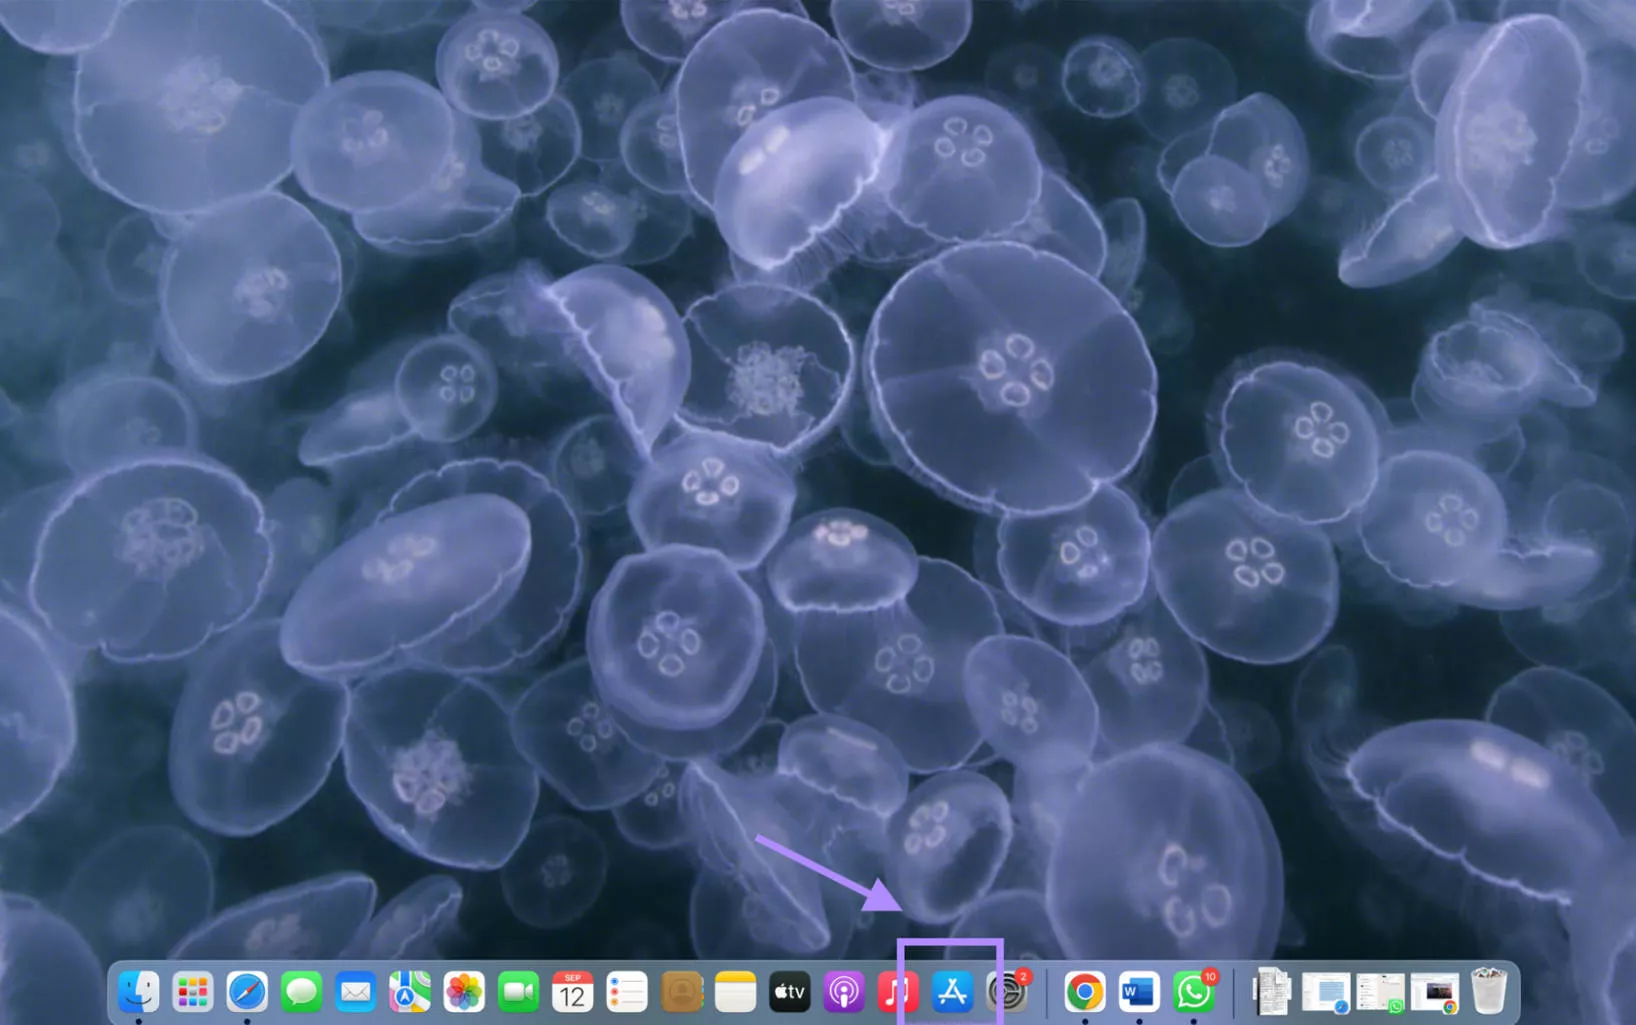
Step 4: Open App Store by clicking its icon from the dock and start your process again.
Also Read: How to Fix Copy and Paste Not Working on Mac? 8 Fixes
Fix 5. Correct System Time in Terminal
The incorrect time and date of your Mac do not allow the installation of the current date. Mac does not verify the installation package of macOS, which leads to installation failure. Set the correct time and date through the terminal by following the steps below for a successful macOS authentication and installation.
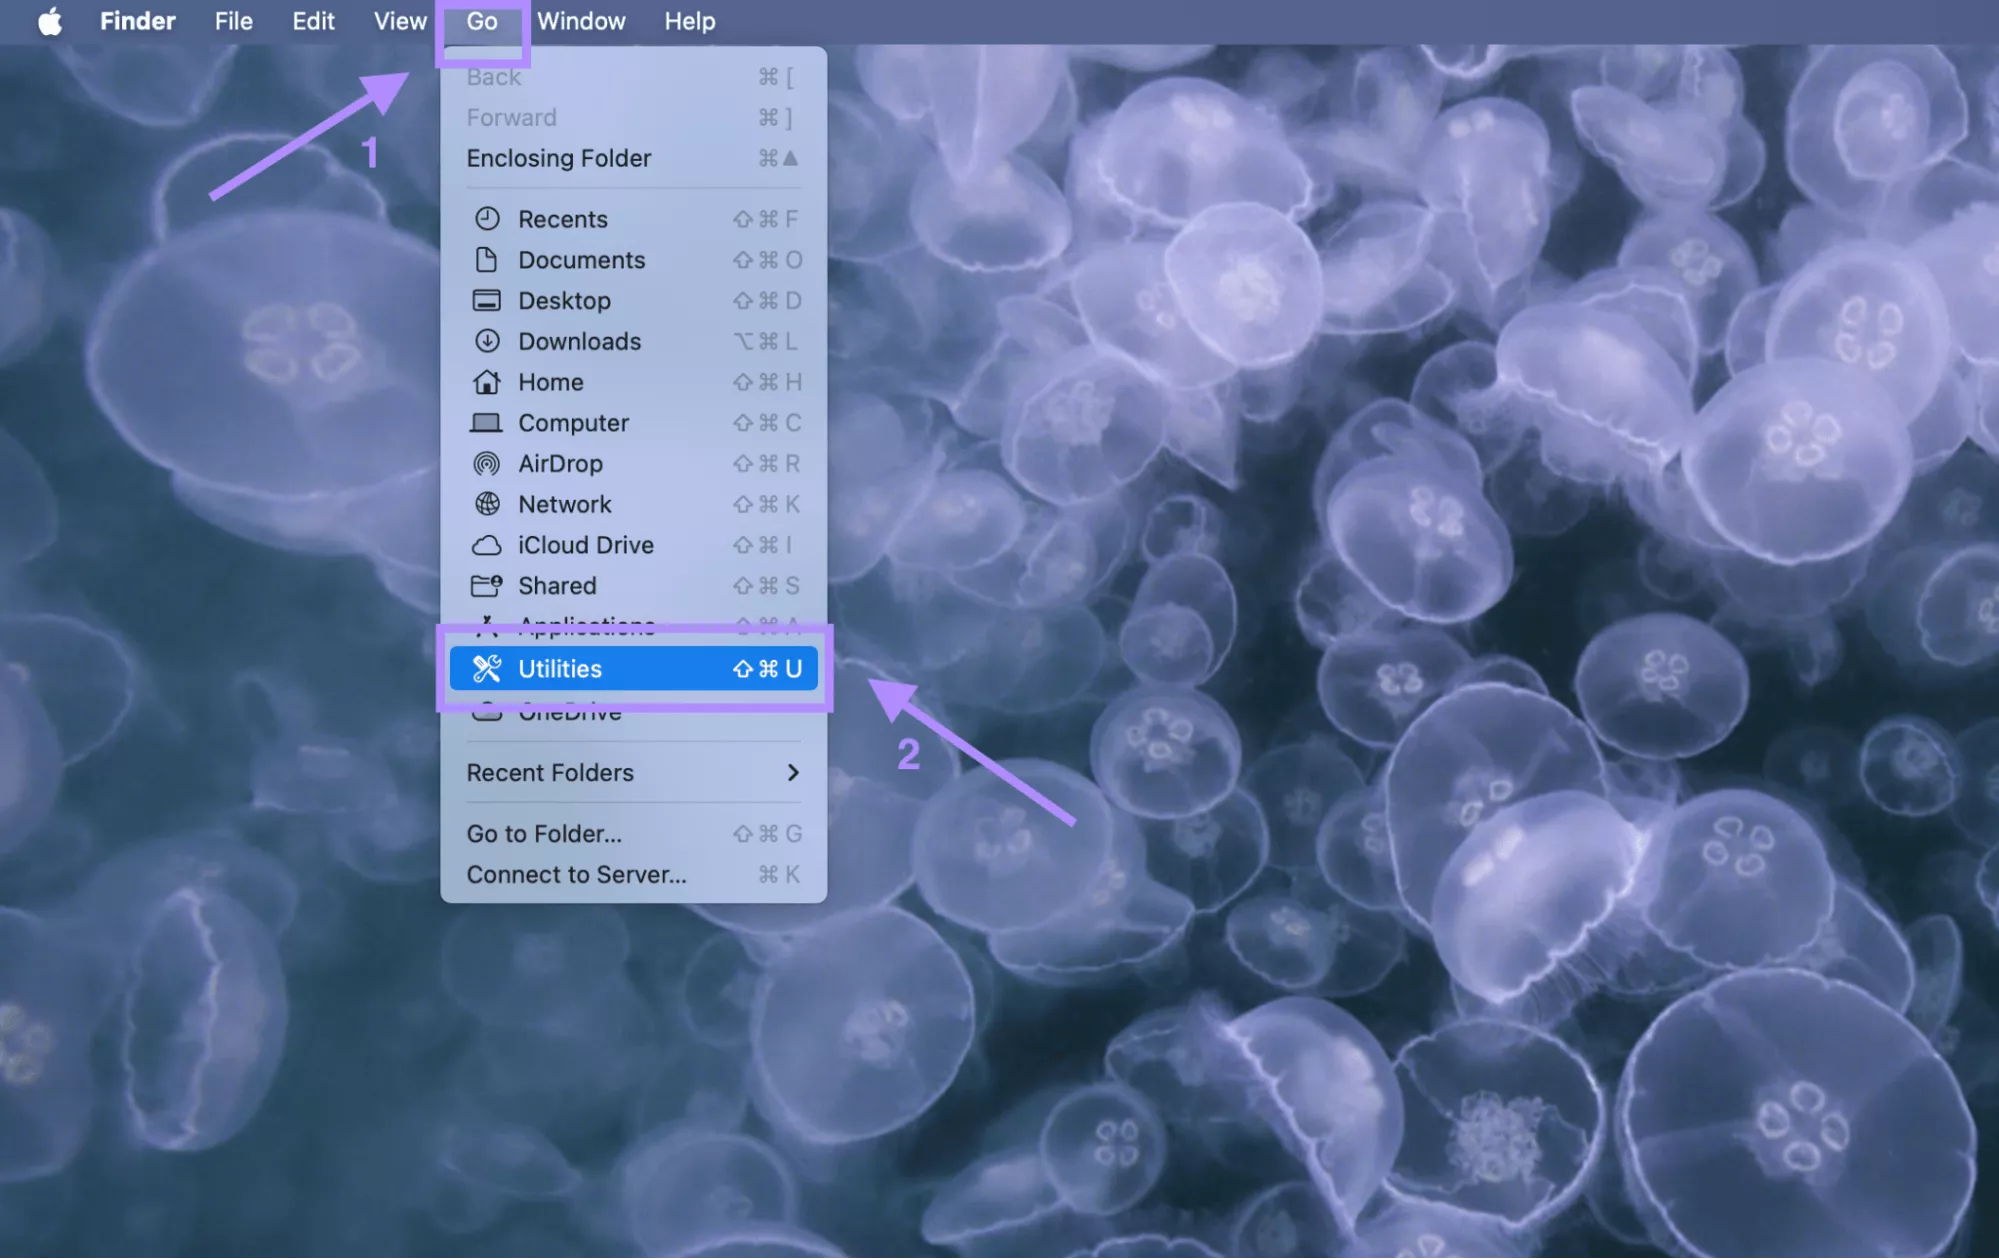
Step 1: Click “Go” from the upper left corner in the menu bar of your Mac homescreen. Then select “Utilities” from the dropdown menu.
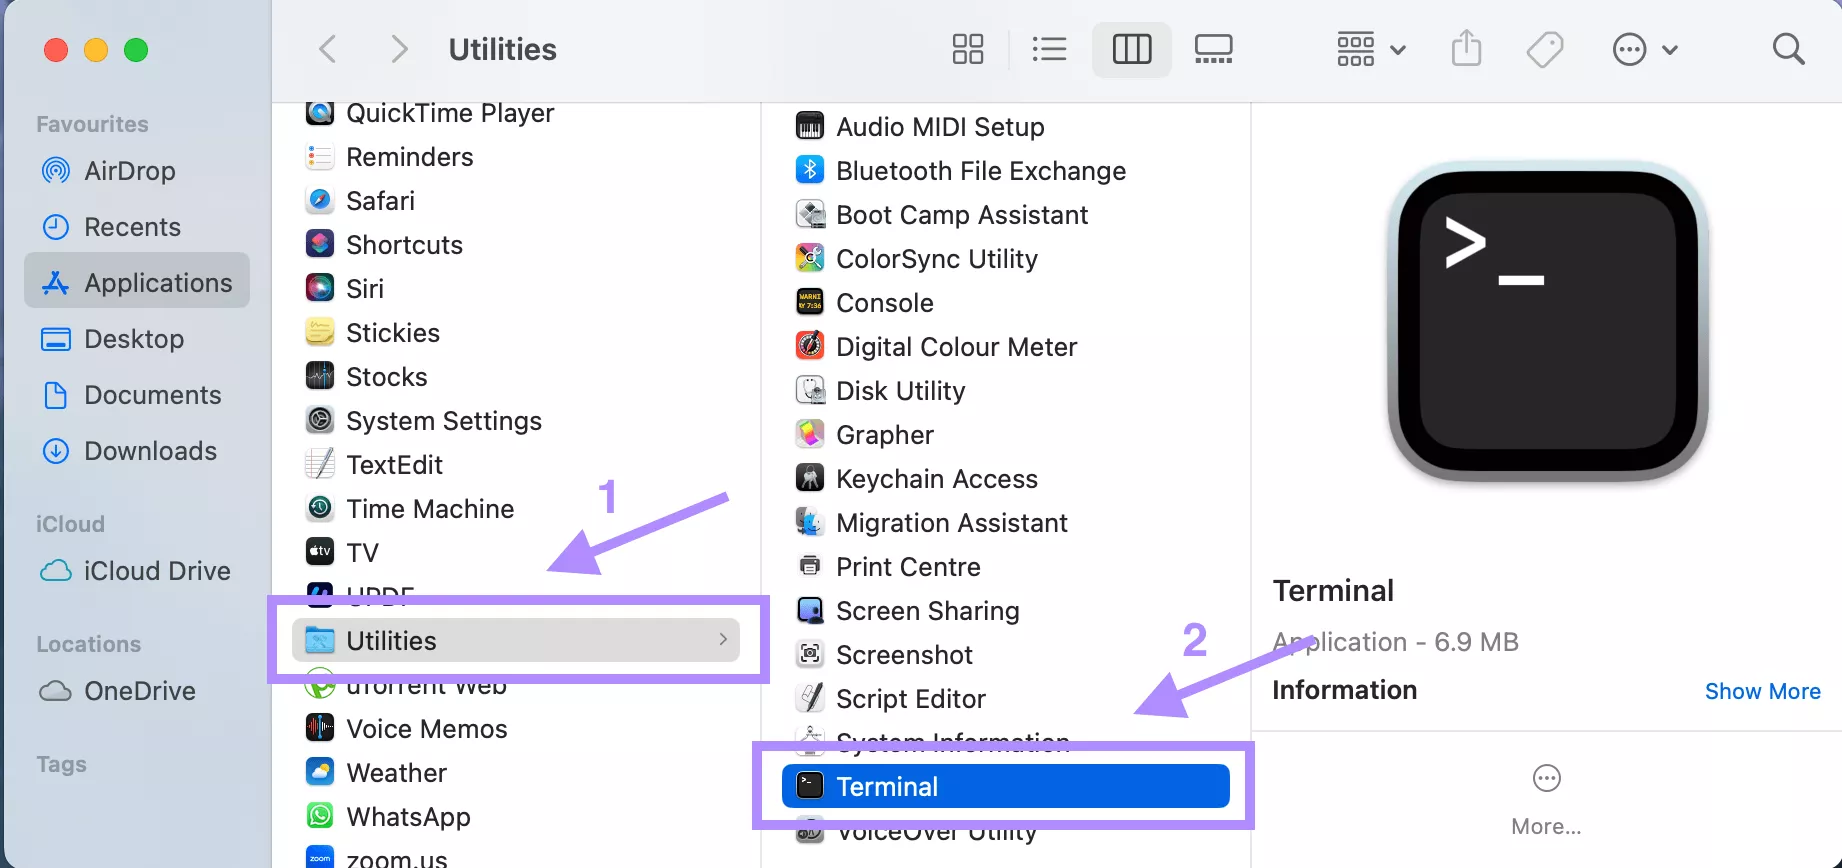
Step 2: Once the utilities window opens, select Terminal from the options and open it.
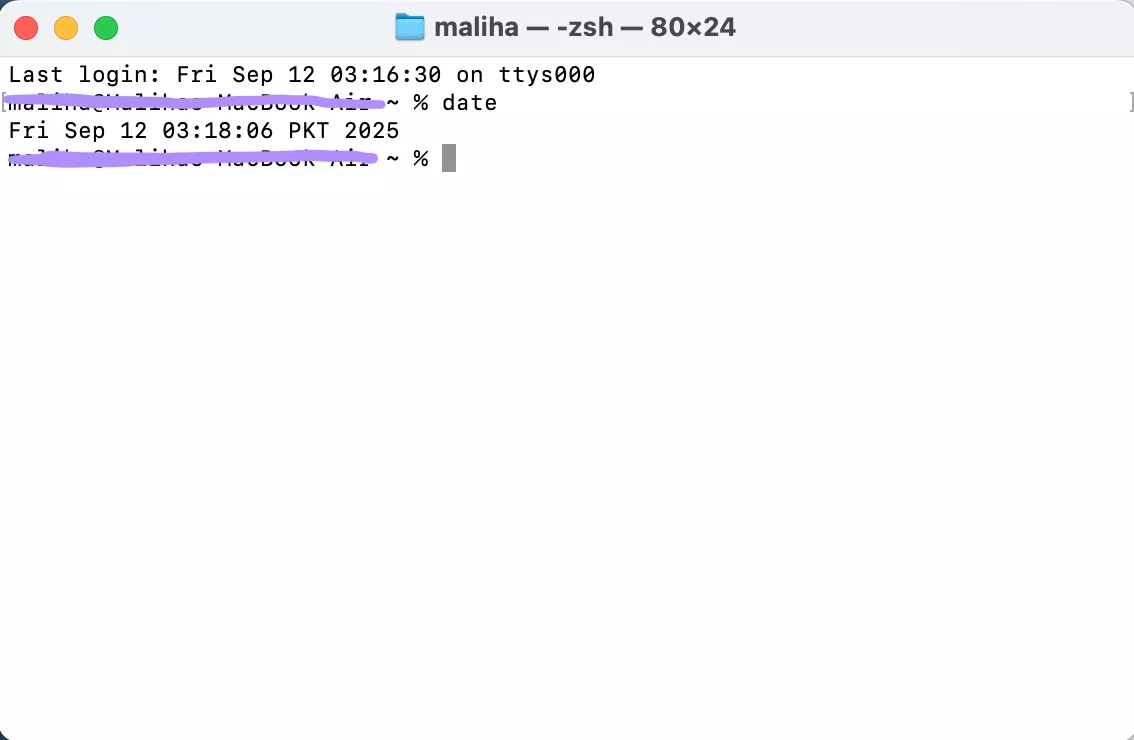
Step 3: Type “date” in the terminal and press “return”. The time and date will be displayed. If incorrect, type date mmddhhmmyy representing month, day, hour, minute, year. For example, 0911102525 for Sept 11, 10:25, 2025.
Step 4: Press “Return” and close the terminal. Now restart your installation.
Fix 6. Erase Mac
If none of the above-mentioned fixes work, erasing your Mac is the last option to go with. This fix will remove all the corrupted data from the system that is interrupting the installation. This last fix option will wipe all your system data, so please remember to back up your data before proceeding. The following steps will guide you on how to erase your Mac.
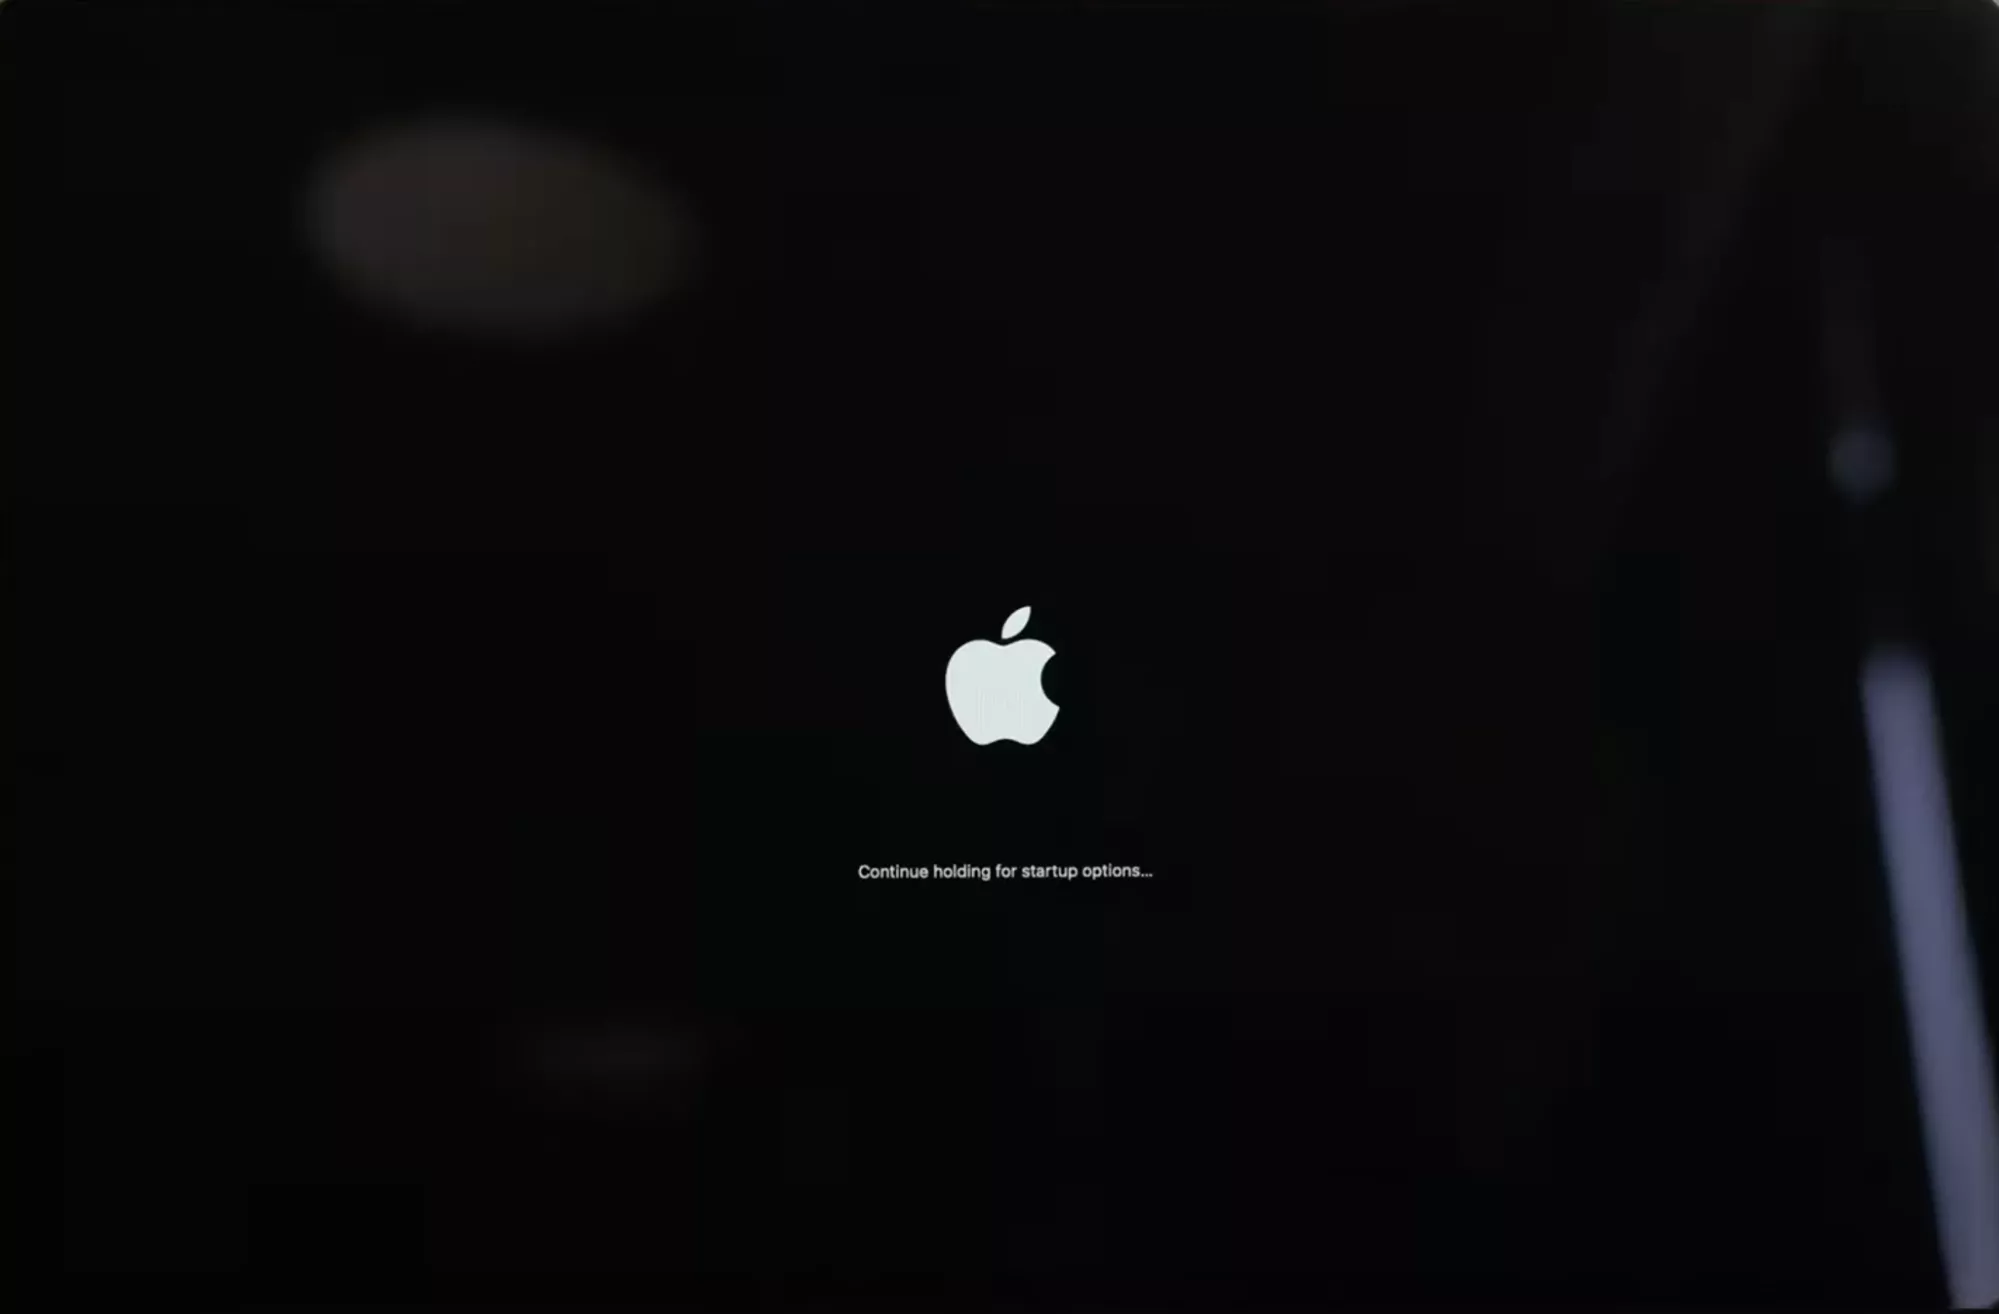
Step 1: Restart your Mac system and immediately hold Command + R from the keyboard to open recovery mode.
Step 2: Select Disk Utility from the macOS Utilities on the screen.
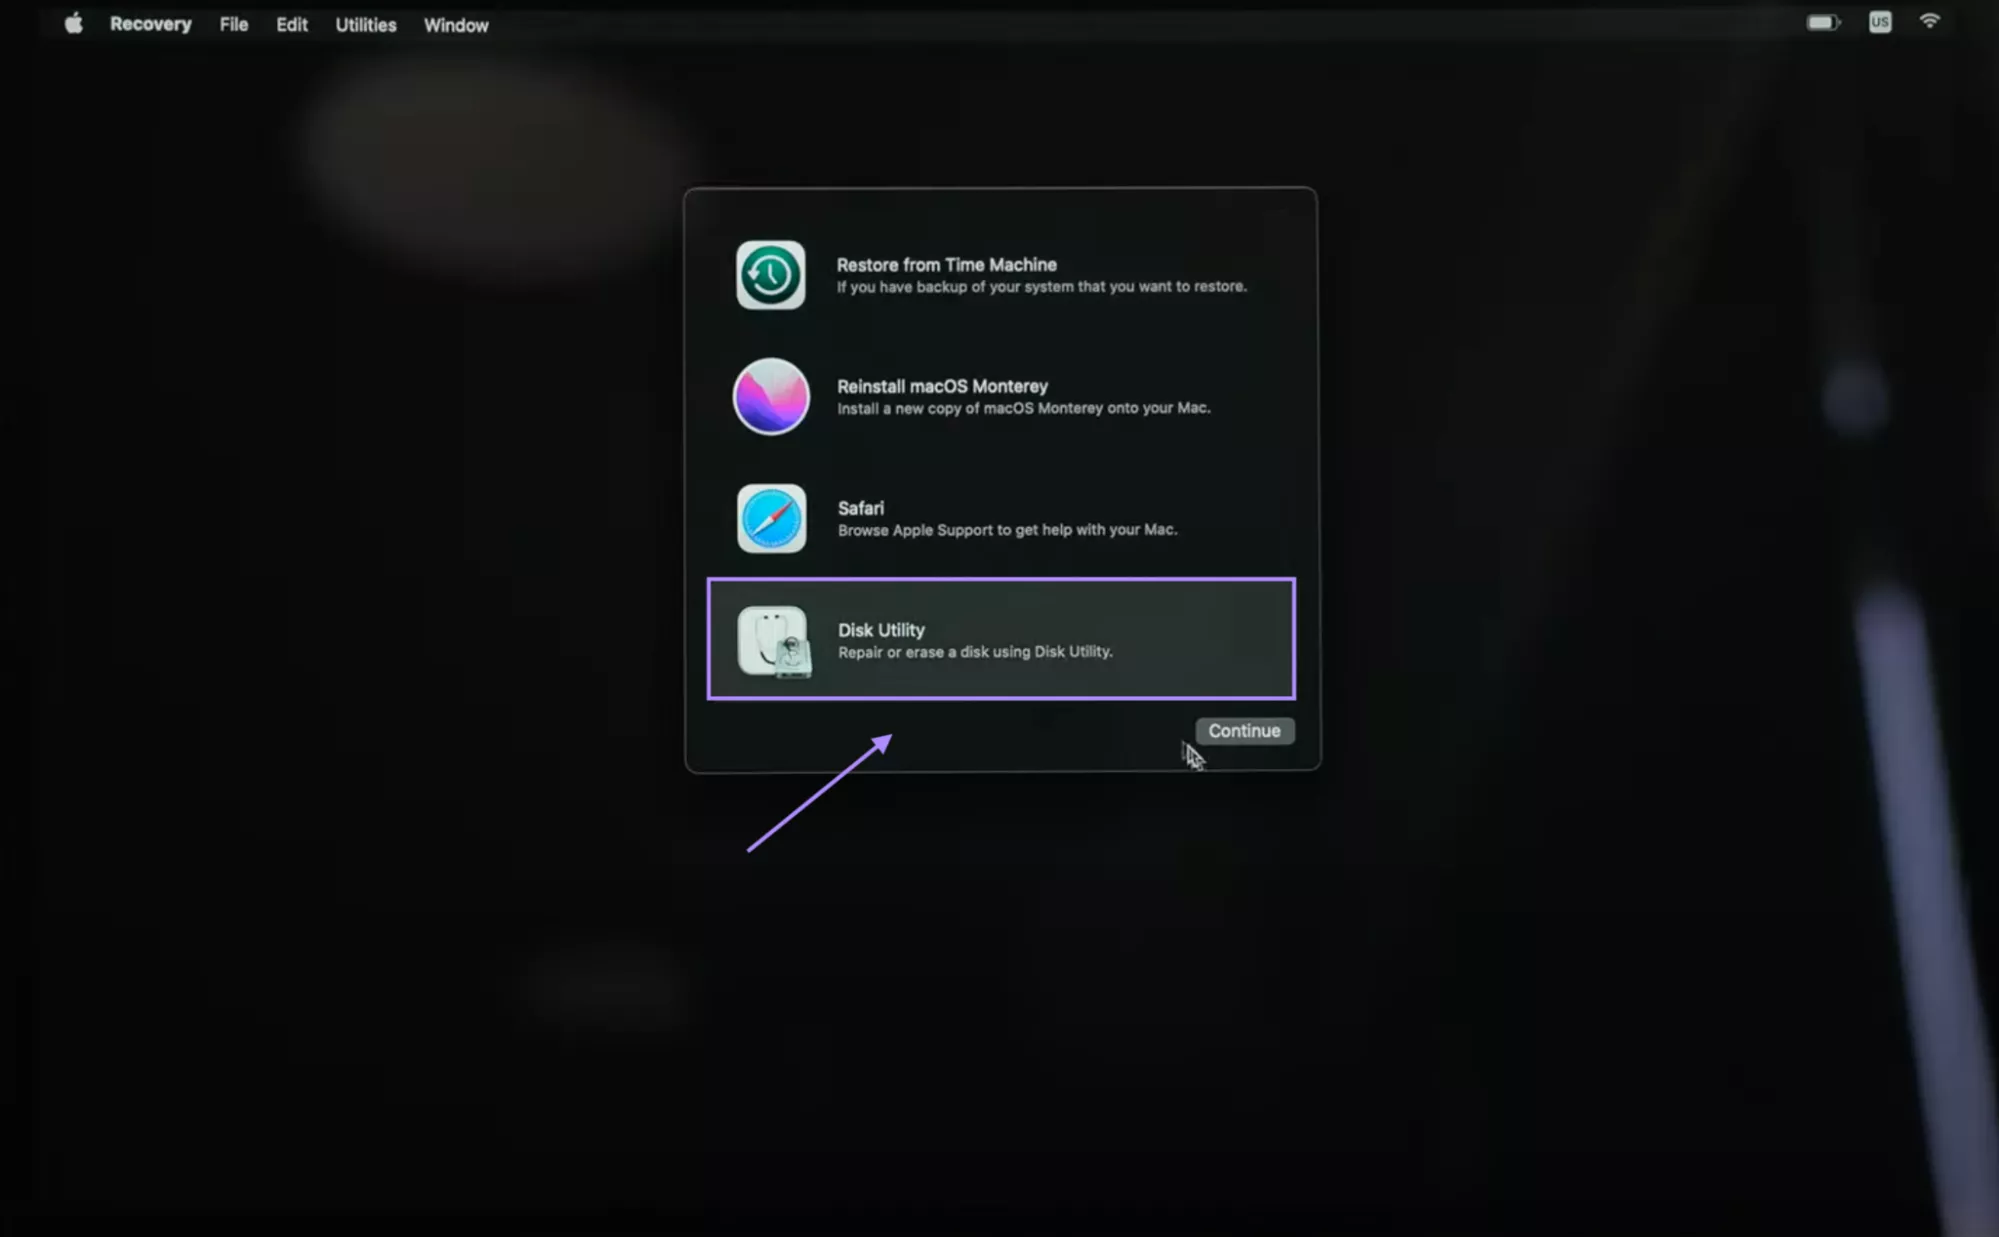
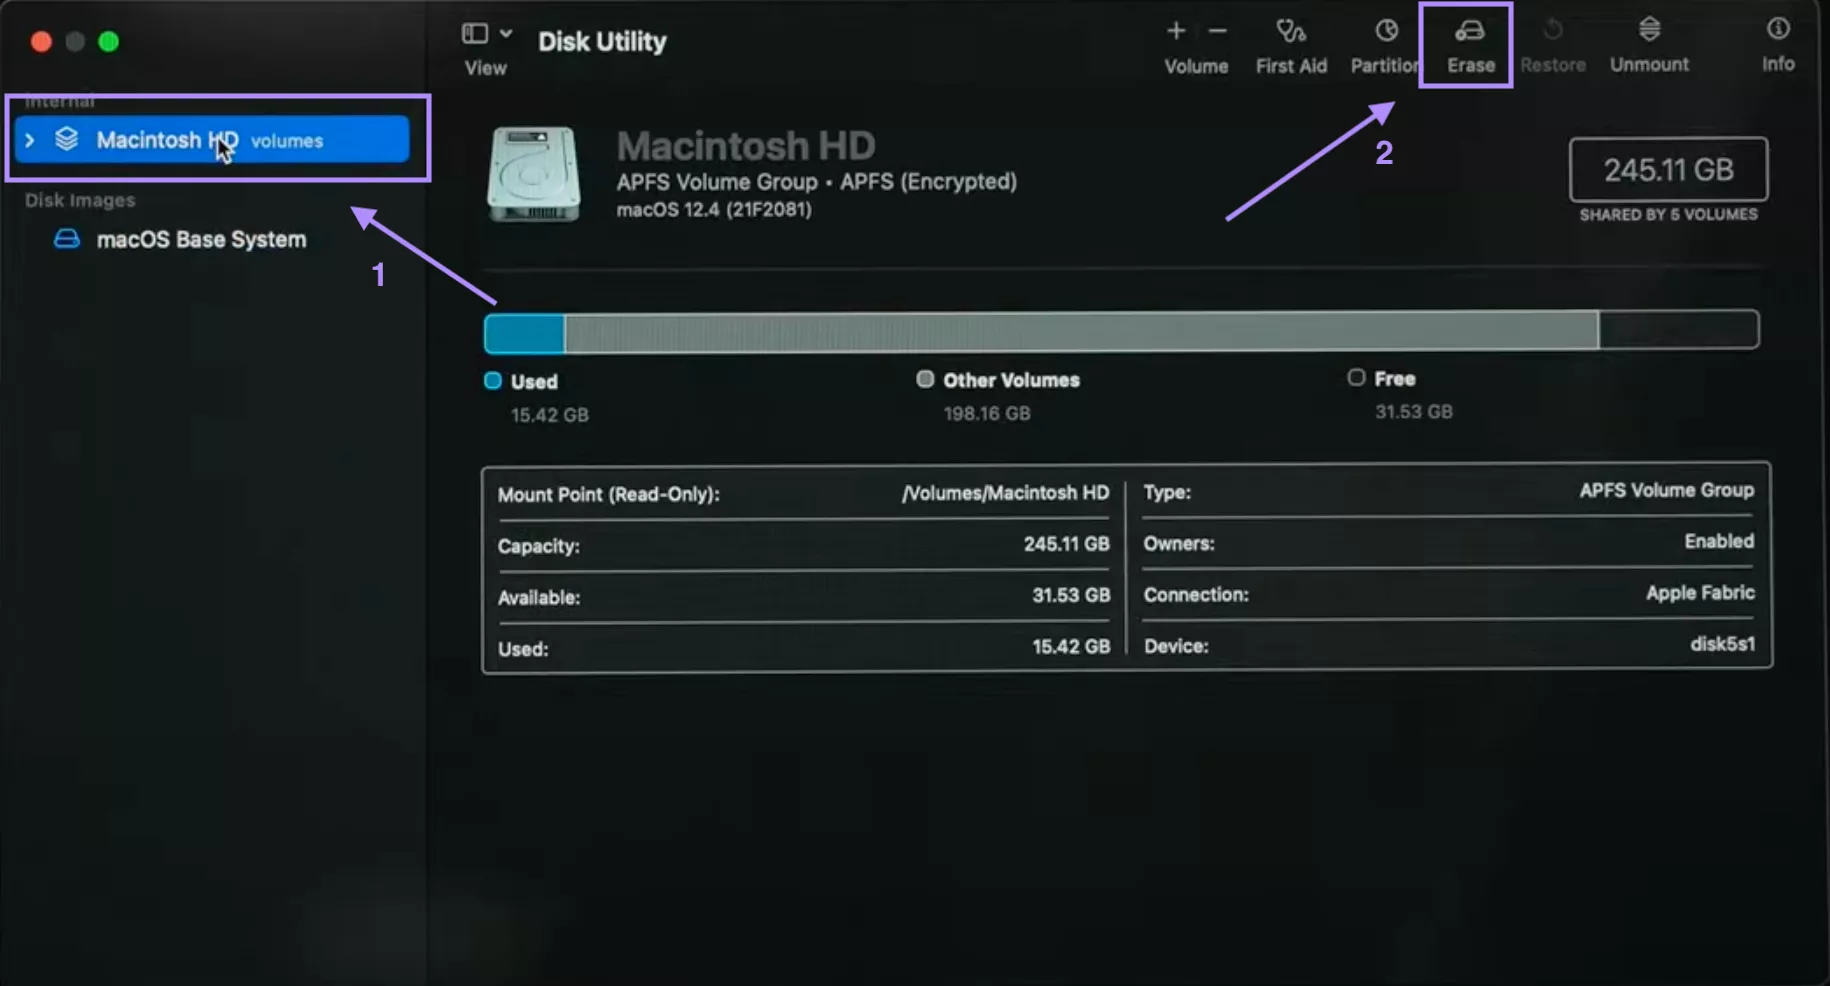
Step 3: Select the start-up disk from the sidebar and click “Erase” from the upper right corner of the window.
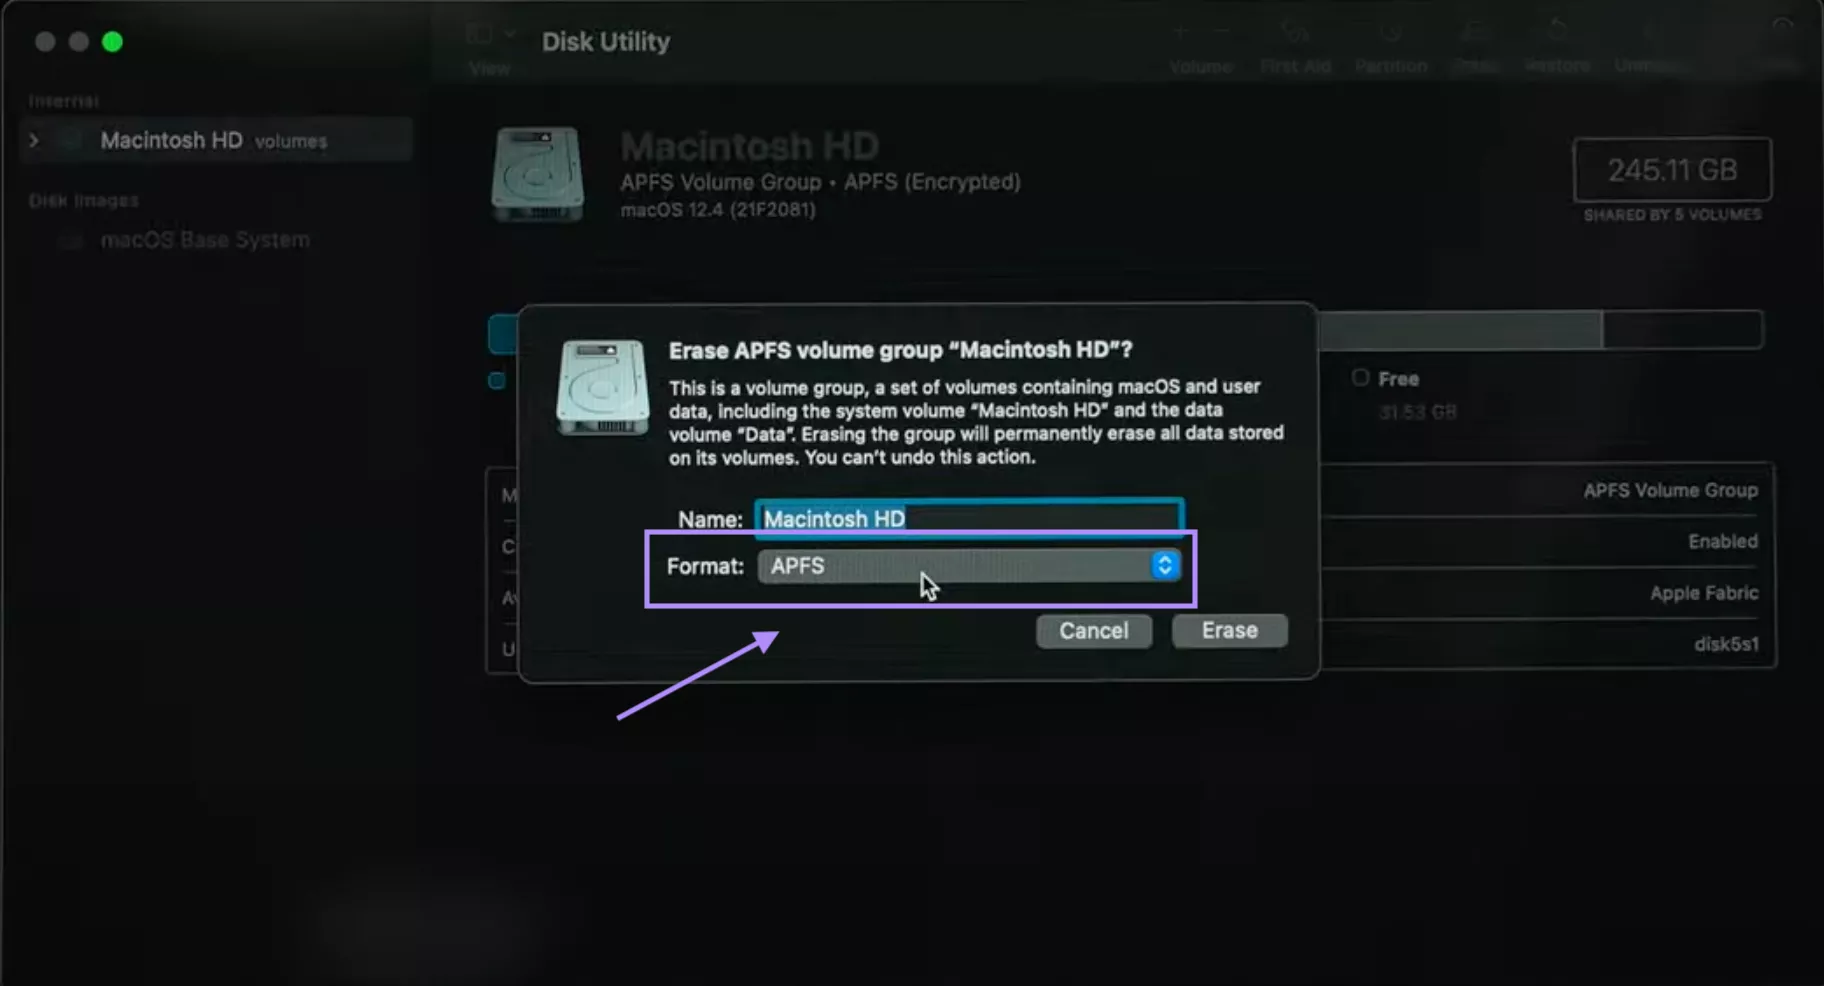
Step 4: Choose the format as “APFS” and click “Confirm”.
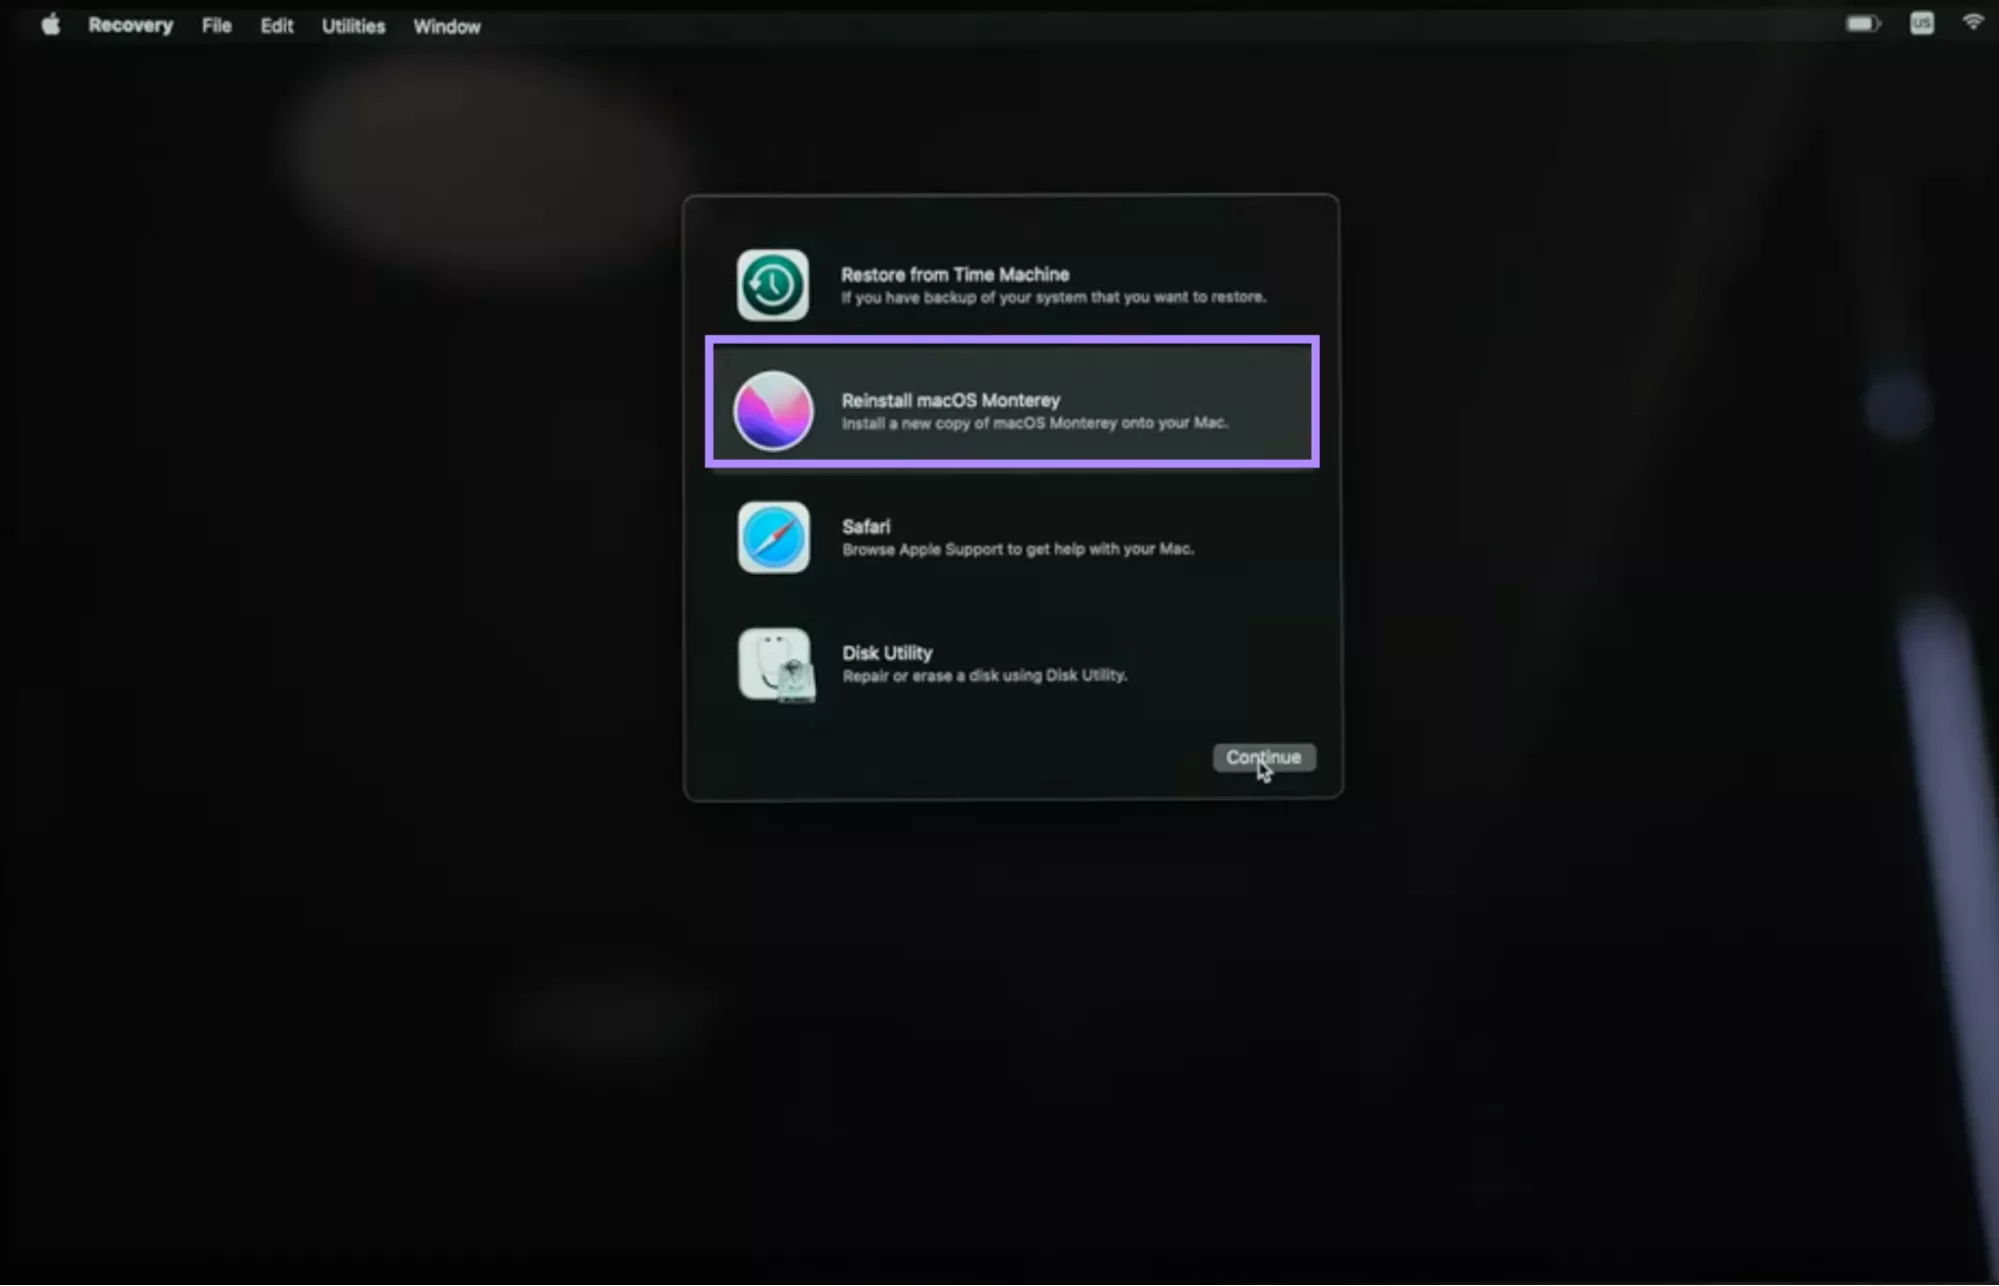
Step 5: Reopen the Utilities window and select “Reinstall macOS” to install the system.
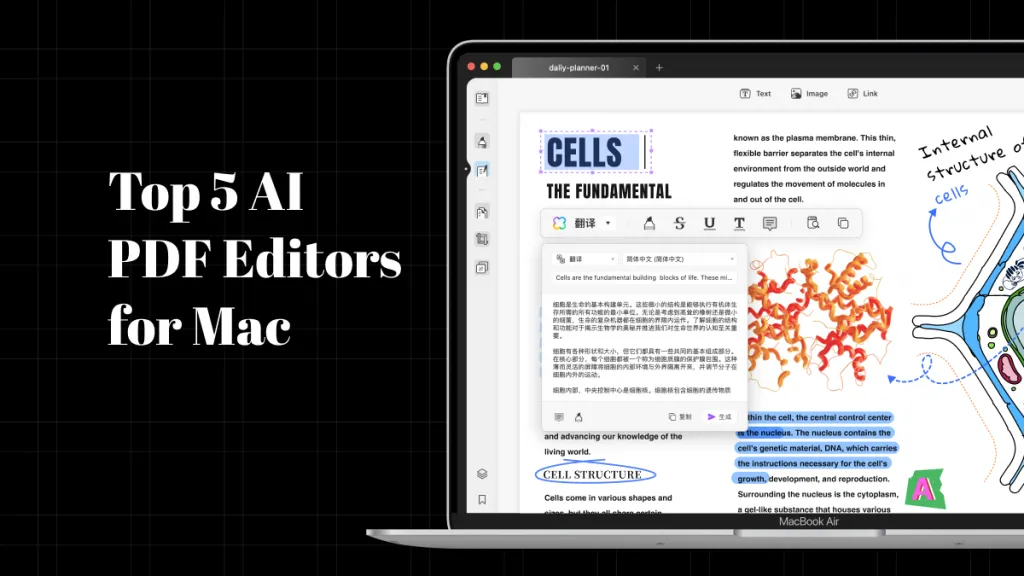
Part 3. Bonus Tip: The Best Mac PDF Viewer and Editor - UPDF
After resolving the installation issue, your Mac works smoothly. It is time to download the UPDF Mac App and improve your work efficiency. UPDF for Mac is an all-in-one PDF viewer app that is designed especially for Mac users. It is fast, takes up less space in your system, and is packed with updated features for efficient working on PDFs. Why wait? Download UPDF for Mac now and enjoy its features.
Windows • macOS • iOS • Android 100% secure
Key Features of UPDF Mac:
- You can open and view larger PDF files on UPDF without any lag time.
- Edit text, links, and images in your PDF files at the same time.
- Highlight comments, links, add notes, and annotate your drawings freely.
- It comes with the flexibility of converting and downloading your PDF file in your desired format, i.e., Excel, Word, PowerPoint, Images, and several other formats.
- You can organize pages by inserting, deleting, rotating, and rearranging your PDF files in the app.
- It features a password-protected and permission-controlled system for securing your sensitive documents and files.
UPDF for Mac has made PDF management as simple as editing a Word file. It is an ideal companion to share your workload and support your macOS system.
Watch the video below or read this article to know more. And if you like this tool, you can purchase UPDF at cheap rates.
Ending Note
Resolving the “macOS installation couldn’t be completed” issue is easier when you identify the root cause and address it with the correct method. Start with the basic fixes, like restarting your Mac to fixing the time and date of your system. If the issue persists, then go for the last option of erasing your Mac. Once your system runs smoothly, do not forget to install UPDF Mac to utilize its tools for maximum productivity in less time. Experience this top-notch app with a refreshed macOS experience.
Windows • macOS • iOS • Android 100% secure


 Enrica Taylor
 Enid Brown
  Lizzy Lozano
 Delia Meyer